We need you!! Pretty please! – no cherry though, I’m not begging.

The 3rd big adventure the hubs and I go on is coming up. In 86 days to be precise, but who’s counting? (Not me, I have an app that counts for me. Cha ching!)

We’re heading off in late August to LA, driving up to San Francisco along the Highway 1, heading to Yosemite to get back to nature, and then losing ourselves in Vegas before heading back to a final night in the Chateau Marmont in LA.  We’re super lucky that this 3rd trip of a lifetime is even a possibility for us when some people don’t get to travel at all, but we’ve worked (and saved) bloody hard for it. Saving seems to be all we know, so when we travel we like to live large and splurge where we can. We’re not complete money bags though and are staying at a few cheapy motels along the way to balance out the extravagant ones.

We’ve finally got our itinerary down pat and all the accommodation is booked, so now we can move onto the fun things like planning what we actually want to DO and not just where we want to stay.

Since most of you lovely readers seem to be US based, it would be crazy of me not to put my feelers out and see what you know and what you like about your home or holiday spots. I mean, I’ve read pretty much all that can be read on Yelp and TripAdvisor, but people post some ridiculous things on there that I take all of it with a grain of salt.  Whereas with you guys, I trust you.  I follow your blogs in return and have an insight into your lives.  Plus, if we’re  following each others blogs, we must be likeminded right?
Continue reading

Quick! To the bandwagon!!

I love hype! No, not the shoe store, but the public excitement and interest that surrounds something.  If there is anything on that has a bit of hype, I want in.  Even if it involves things I don’t like or enjoy, I’m on board.  And if there’s something happening in the media that is big news, I’ll google the living shiza out of it.  I think it’s the fear of not knowing what I am missing out on, but whatever it is, it’s a real thing I have.

So, when I stumbled upon an article about the benefits of drinking water it was only natural inevitable that I was going to jump on the bandwagon.

Reading about drinking water isn’t entertaining I know. It’s far from the kind of drinking that makes you want to call everyone in your phone book at 3am. And is definitely not the kind that makes you wonder how you got home and why the contents of your purse are all strewn across the house.  And why exactly is there a half a sausage roll wrapped up in a napkin on the floor? (I don’t know, but I’m eating it.)

If you stop reading now, I wouldn’t blame you. BUT YOU TOTALLY SHOULDN’T!! And these photos should be enough to intrigue you as to why not.

Read on my friends, read on.

After four weeks: Sarah looks like a different woman

This is Sarah Smith and she recently wrote a pretty convincing journal for The Daily Mail called “Drinking three litres of water a day took TEN YEARS off my face“.  If you haven’t read it yet, go now. I’ll wait.

OK, everybody back? Good.

The gist is Sarah started drinking the recommended 3 litres of water a day and documented it over a four week period. The results in the photo above speak for themselves, but if you need facts:

  • Organs will be flushed out and happy
  • Improved complexion and clearer face
  • Better breath
  • No headaches
  • Flatter stomach and improved, if not vanished cellulite
  • No more dark rings around eyes
  • Improved productivity and concentration
  • Eating less because water keeps you feeling full for longer
  • Skin seems to have more elasticity
  • Feeling fitter, leaner and healthier

Sign me up for all of them!!!

My sister and I both agreed to take on this 3L (or 8 glasses) of water a day challenge since Thursday 15 May, and I have kept a note of how each day has been going just because I’m intrigued to see how it plays out.

The first day was bloody hard!! I was so full and so over going to the bathroom I thought I may never look at water again, but strangely woke up the next day and water was the first thing I thought about.  Weekends are tough and I admit I may not have made the full 3L as commitments (like sitting in the hairdresser for 2.5hrs) make it difficult.

Back into the 9-5 though it became easier and on one day I even finished my 6 glass limit by 4pm. (I save the 2 other glasses for in the evening).

Average number of toilet breaks a day? About 6-8.  Is it annoying? Hell yes.

I’m now a little over a week in: Have I noticed any changes? Yes.

  • It is getting easier and I don’t feel like I am forcing myself to drink it anymore. It’s just something I ‘need’ to do.
  • Weirdly, since I began, I have woken up every morning STARVING! Normally I need to be awake for an hour or so for my hunger to kick in. Even after day 1 I have been hungry.
  • Now, how to put this nicely… my um, dimply bits aren’t as dimply. There I said it. I have dimply bits. But they’re totally improving and that alone is enough to keep me going!!!

I haven’t been taking photos, but I have enough selfies (shoosh, you do too) to keep track of any progress or changes.

Get on the bandwagon… it’s a guaranteed good time and your other half will thank me when those dimply bits are at bay. Seriously!!! Who knew that water was the cure!!!

On that note, I’m off for a toilet break and to get glass number 5 for today :)

photo

Oh Jenny Don’t Be Hasty…

Is what I  said to myself last week when I spied that rug. It was too perfect to be true – the colour, the pattern, the price! But sensible Jenny still took over and told me to go home and measure the space before clicking ‘purchase’.

So I did, and I reported back in my post that there would be 5cm of floor space around the rug and everything was still too perfect to be true. But it MUST be. So I clicked purchase with much excitement. I’ve got to say though, the cheap price did freak me out a bit and I did some review hunting for Milan Direct. There were too many good comments to outweigh the bad and the bad were generally about delivery issues and “they wouldn’t help me carry it inside” kinda thing. Pish posh people. I read all of that on the website before buying the rug so I was comfortable that these people were simply whingers who hadn’t done their homework.  Plus, the hubs is flexible enough with his work to be home to receive a delivery whenever I ask tell him to be (not really, but kinda) so I wasn’t worried.

The rug arrived yesterday no problemo. So take that whinge-y reviewers! However, in whingers defence, I was told that I would receive a phone call from them the day before delivery to confirm everything so was surprised when they called and said “it will be coming today between 9:30am and 11am”. Whaaa? But Ben was home luckily so no drama.

The worst part about knowing something has been delivered? Waiting all day to get home to play with it. Damn employment!!

The wait was worth it though because when I unrolled that bad boy I was totally stoked! But…

Continue reading

I didn’t choose the rug life – the rug life chose me.

Ok bad pun maybe, but it’s TRUE!

I wanted a rug for under the dining table in the kitchen.  I wanted colour. And I needed cheap. Want, want, need. That’s a fair breakdown I reckon.

Enter this beauty…Or should I say hussy… I mean, she practically threw herself at me. (I don’t know when she became female, but roll with it).

Picture1It looks black but is actually navy and I am in love with it.  An email from Milan Direct landed in my inbox – ‘RUG SALE’ it read. Now, to a person who has been hunting for rugs, that’s practically like saying ‘CHEAP HEROIN’ to a junkie. (But sorry to disappoint, no heroin here – that shit cray!) Then the $129 price tag cleared everything up and I knew it was meant to be. Still, I am a true tightass and couldn’t commit until I knew that it would fit, so I contained my little belly butterflies and went home to measure it.

And it was perfect!! A true soulmate wouldn’t lure me in and then leave me empty handed.

Jokes aside, the navy thing really answered a lot of questions for me and strangely navy didn’t even come into my head!! 

  1. It introduces another colour so my kitchen isn’t just stuck to grey, white and red.
  2. It grounds the skimpy dining table.
  3. It helps solve the splashback colour issue. Because there will now be a big chunk of colour in the room, I’m confident a white splashback won’t be too much white on white.
  4. The cupboard that needs painting will now be navy and white.

Halle-freakin’-lujah!!!

So – here are the photos of the dining side WITH the chair that I forgot in my last post. The rug will cover almost all of that space. The dining table and arm chair will both sit on it, with roughly a 5cm gap around each edge. Smokey’s bowls will need to find a new home though.

This shot also make me think that the dining table should be painted/stainted to match the dark chair legs. Mum has also got me thinking about recovering those dining chairs. Hmmm… That, I’m not 100% sure of but never say never.

Photo 5-15-14, 7 38 57 PM

(Birthday flowers compliments of the husband. Good boy.)

Photo 5-15-14, 7 39 26 PM

Where the candlesticks are is where the cupboard I need to paint will go. With some shelves or art above (part of me thinks it might get a bit busy with shelves, but the other part of me loves layered kitchens. I have to just ride this out and see what works I think).

Photo 5-15-14, 7 39 34 PM

The all important cupboard – where my next project begins – will hopefully look somewhat like these stunning drawers!! Well, that’s the plan… Obviously, there will only be one panel on each cupboard door instead of three drawers, but I’ll add the white trim around each and paint the panel navy with funky door handles. I’d also like to put fun hooks on the left hand side so I have somewhere to hang my tea towels.

Photo 5-10-14, 9 41 20 PM

Sadly, the weekend is quite full already  so I’m hoping that I’ll be able to get cracking on with this over the next week. But for now, I am doing cartwheels in my head because I have a plan.

Don’t mess with a girl with a plan!!


The Big Kitchen Reveal…

FINALLY – the reveal! I realise there is still work to do, but this is the closest thing to a normal kitchen we’ve had in the almost 3 weeks since we finished the floors.

I had to look at the calendar to see how long it actually has been, and really, it’s actually a little under 3 weeks so I don’t feel like we were too lazy getting things wrapped up.

Here’s a few piccies for you to enjoy for now. I’ll get to the nitty gritty down below.

The dining side…

Photo 5-10-14, 11 19 08 PM

Photo 5-10-14, 11 22 06 PM

Photo 5-10-14, 11 22 39 PM

Photo 5-10-14, 11 21 09 PM

Photo 5-10-14, 11 21 51 PM

I realise I’ve forgotten to take a photo of the arm chair in the space, but it still lives in that right hand side corner. I did discuss with someone in the comments of a previous post, shifting the chair to be beside the fireplace as a reading nook, but the chair has to be angled inward and having it face away from the fireplace looked silly and seemed to close the space in more.

Since this photo though, we have found a home for the wine rack, tucked away in a cupboard and the candlesticks are no longer behind the chair, so it feels a lot lighter and roomier.

Photo 3-30-14 6 42 30 PM


I also realise I don’t have a photo of beside the fireplace. That’s because there is nothing there yet. We will be putting Ben’s Nana’s cupboard back there, where it was previously, but I can’t bring myself to put it back into the room while it’s still beige. The less beige I see, the better. Plus, it’s still currently living in the loungeroom, and I’m sure that I’ll soon tire of it in there and force myself to do something about it’s ugliness… I.e. paint the sucker!

The problem I have – is what colour!?

Photo 17-08-13 3 57 50 PM


Now the actual kitchen side… where the magic happens. 

It doesn’t look great. I know. You don’t need to tell me. Firstly – this photo isn’t styled at ALL. Frypan is out, pot on the sink, cat food tin beside the micro. All very classy stuff right?

Just ignore those bits. For now, the bench area is a work in progress still. I am trying to work out if there is a better way I can move things around to be more user friendly. You know, 2 and a half years later. Funny how you just get used to things being the way they are, because that’s the way they are.

Well now, with it all being so fresh, I’m trying to look at this area with a fresh pair of eyes and almost move things around daily.

The window has been painted white, and this is almost one of my favourite changes about the room! It made SUCH a big difference.

photo 1

Despite all the chaos in this side of the room, the details above the cupboards look pretty…

Photo 5-10-14, 11 23 20 PM

The old port bottles and scales were Ben’s grandfathers…

Photo 5-10-14, 11 23 58 PM

Photo 5-10-14, 11 24 36 PM

Photo 5-10-14, 11 25 49 PM

Photo 5-10-14, 11 25 39 PM

The very first world problem I’m faced with (other than what colour to paint the cupboard), is what to do with our splashback. There are quite a lot of tiles almost falling off and we always envisaged we’d just replace them with all new tiles. But our back pockets are thinking that maybe an interim fix would just be to reattach them, and paint the tiles like we have in our bathroom.

BUT WHAT COLOUR!? My photoshop skills are zero, so I won’t be able to do up mock ones – so please use your imagination. Colours we’ve considered:

  1. White: The white bathroom tiles have taught me that they show up everything. They’re a great finish, but I am constantly wiping them down to remove bits of towel fluff, dust, and other random marks.
  2. Black: I thought the room could use a block colour to ‘ground’ it. It’s all a little wishy washy I think and needs some punch. My mum says though, that black splashbacks are also a nightmare to keep clean, and show up everything.
  3. Red: As above – the big hit of colour could be just what the room needs. I’ve spent a lot of time on Pinterest looking at red splashbacks and I just can’t seem to find any that don’t look retro. I don’t want the kitchen to look like there should be an old Coke dispenser in the corner, or that I should have an apron on and pin curls in at all times.
  4. Turquoise: The books in the photos below show how well the red and grey bounce off turquoise. It looks light and crisp and may brighten the room nicely and allow me to keep the majority of my accessories red, but also to introduce other colours like yellow.

Photo 5-10-14, 11 22 39 PM

Photo 5-10-14, 11 21 09 PM

A project for the (not too distant) future though so I have some time to think on it. I’d love your input though. What do you think I should do with the cupboard, and what colour would you go for on the splashback?


ITS MY BIRTHDAY!!

And I’ll post about it if I want to :)

Picture1

The girls at work know what’s what. :)

I don’t even know where to start. I’m giddy. I know it’s silly and lots of people lose interest in their birthdays as they get older… but not me. Birthdays always were a big deal to us (Mum would decorate the whole house while we were at school) and it’s just kind of stuck.  That doesn’t happen these days, but the birthday love that comes with social media is enough to get me all smiley anyways. “HOW many people commented?”

I know you shouldn’t get such satisfaction from likes and comments, but lets face it, we do. But it’s not just that. I get satisfaction that people that I rarely speak to take the time to write a message. Even if it’s just ‘happy birthday’… they didn’t have to, so I always make a point of replying to each one, at least to say thanks.

I guess maybe the satisfaction I feel then is not from how many people decided to comment, but just that today is the one day of the year I feel more connected to everyone than any other day. So…

Continue reading

The floors!! I forgot the floors! Part 4 of the Kitchen Makeover

I was in the shower this morning thinking about plans for the weekend and getting everything finished in the kitchen / bar area in time for when the family come over for Mothers Day and I realised I jumped the gun a bit with my last couple of posts.  I never actually got around to mentioning staining the floorboards!

Photo 4-25-14, 8 10 14 AM

Continue reading

What really went down this weekend…

I do remember saying something silly last week about there being a kitchen reveal post on Monday. Yesterday. Today is Tuesday. Yes, yes, I know.  And no, I’m not hungover this week (although I may well be tomorrow),  but when I wrote that post I totally forgot we actually had weekend commitments and nothing got done. I had planned to paint the skirting board either Friday or Saturday and actually prepared myself and the space for it Friday night. Open the tin… 

No dice. So I did what any normal self respecting, highly motivated DIYer would do.

Sat on the couch and watched Real Housewives of Melbourne.

Photo 5-3-14, 1 38 11 PM

This tin is only from about July last year and I know that because I bought it when I went to paint the fireplace after the last tin had dried up the same.  I’m told that it’s probably a skin on the paint and I should be able to scrape it off and thin out the remaining paint with a little turps. So that’s a job for tomorrow night later. Fingers crossed. 

So now we have drop sheets down again, and one oddly placed dining chair.

Photo 5-4-14, 8 46 30 PM

Then, Saturday. My groceries were delivered and all meal planning plans were going to plan. I cooked a roast chicken. It was going to be a fancy chicken, with stuffing and stuff but day plans weren’t going to plan and I was running crazy late with dinner before hubs had to work. I stuck it in and prayed to the chicken gods.

No dice. Raw. So I did what I would do when I yell at the Masterchef contestants. “Cut the breasts off and put them in a pan!!” So I did. And then I put the chicken back in the oven and all was good.

Photo 5-3-14, 4 40 49 PM

Sunday we spent the day at our sister in laws baby shower and were asked to bring some snacks. My two go-to’s? Guac and hummus. And I’m not tooting my own horn, but 4 people separately commented on each of them. Boo-yah!! 

My guac… 2 avocados, finely tomatoes, red onion and 1 jalepeno, fresh coriander, juice of 1 lime, and then a good seasoning.  Because everyone loves this… here’s how I make it.

Mash your av’s with a fork on a plate (this is how I mash bananas too) a fork is flat and a plate is flat. Why use a bowl?

Photo 5-4-14, 10 01 03 AM

Then chop everything up

Photo 5-4-14, 10 11 03 AM

Then season your av and pile everything on top and fold it in on itself. I spin the plate with my left hand, and fold with the fork in my right. Once it’s all mashed up easily, you can see what you need more of. (it’s easy to say 2 avocados, half a red onion, 1 tomato etc.. but everything is always different sizes. Sometimes half an onion will be way too much. Or sometimes you’ll have cherry tomatoes on hand instead of a big one. It’s easier to chop and add more than to put too much in at the beginning).

Photo 5-4-14, 10 12 29 AM

I stirred my coriander through last, and then topped with some more for pretty presentation.

In a not so pretty bowl.

Photo 5-4-14, 10 20 42 AM

Jamie Oliver’s hummus

This may just be the easiest thing you make.  1 can of chick peas (don’t be a tightass, buy nice ones, it makes a difference!), juice of 1 lemon, 1 tbs smooth peanut butter, 1 heaped tbs yoghurt (I use greek) and a pinch of cumin… and seasoning. Always seasoning!

Put everything in a food processor and wazz it up. Taste it. Maybe add more PB, more lemon, or more yoghurt. Wazz again. Taste. Season. Taste. Spoon into a bowl and brag about your awesome home made 2 minute hummus. Yummo!

Paprika on top is nice if you’re feeling a bit pretty.

Photo 5-4-14, 10 39 44 AM

Sooo we got home late and according to my meal plan was supposed to have had a slow cooker on. I didn’t bother though because I had half a fricken chicken. Sooo I piggy backed off this recipe and made individual chicken mornay’s for dinner. Yes, I’m calling it a mornay now. Photo 5-4-14, 8 47 36 PM

“But Jenny, you only have a benchtop oven, an electric frypan and a microwave… however did you?”

  1. Peel and microwave potatoes until soft. I used 2.
  2. While that’s going down, shred the chicken. My least favourite job ever!
  3. Make a microwave white sauce. “WHAT?” Yep. zap 2 tbs butter until just melted. Mix in 2 tbs of flour until you have a smooth paste. Whisk in a cup of milk and whisk until smooth. Zap for 45 seconds and then stir and do this about 4 times. You’ll soon see it thicken up and then, season the life out if it and you can add cheese too if you like.
  4. Into your white sauce add your shredded chicken, potatoes and a few frozen peas.  Pile them into cool little ramekins you bought at a thrift store. Top with bread crumbs. Please don’t use the box kind, they’re not the same. I make my own and freeze them in batches. This batch was leftover from Easter and had chives, parsley and parmesan through them.
  5. Bake for 20mins.
  6. Devour.

Photo 5-4-14, 8 53 35 PMAnd that was our weekend in a nutshell.

If you really must know… last night we had a butter chicken curry from a jar. Tsk tsk tsk. It’s fricken yummy though so who cares?

Photo 5-5-14, 7 32 12 PM

Happy eating, reading, drinking, painting, whatever you’re doing. :)

Kitchen Makeover Phase 3 – (Pain)ting

“Man I love painting. I’m actually so relaxed right now”…. She said after approximately 1 hour of painting. Little did she know, it was to become a 3 day saga that would make her never want to look at a paintbrush again.

But it was sooo worth it!! My brother in law popped in last night and couldn’t believe we’d done the paint job ourselves. He was stunned by how good everything came up, and so am I still. My whole motto for this project was “I want it to look professional”… hence all the sanding, scrubbing, and general wall loving… so to hear someone say it looks like we paid someone was the best compliment I could get. Thank you, our work here is done. 

We started with the ceiling and because there was no real risk of ruining anything, we both cut in to speed things up. Side note: I’m a good cutter inner, Ben is not. After that was done, Ben got onto rolling the first coat, while I headed outside to stain a second shelf that we’ve since added to the bar. More on that later. 

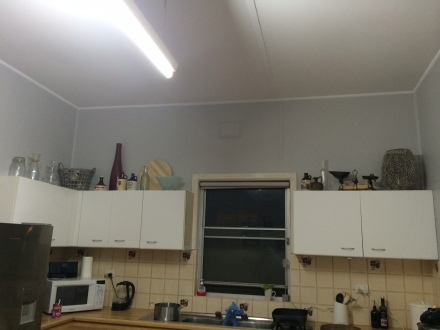
I don’t think I’ve ever mentioned it, but our ceiling was the same lovely shade of yellowy beige as the rest of the walls. This very old photo seems to be the only shot of the ceiling I have because it’s so damn high, it never fits into frame. And while the dodgy light is deceiving here, it’s a true story. Beige on beige.

Photo 29-08-13 9 13 57 PM

Cutting in started by looking like this, and we were already excited!

Photo 4-22-14, 11 05 39 AM

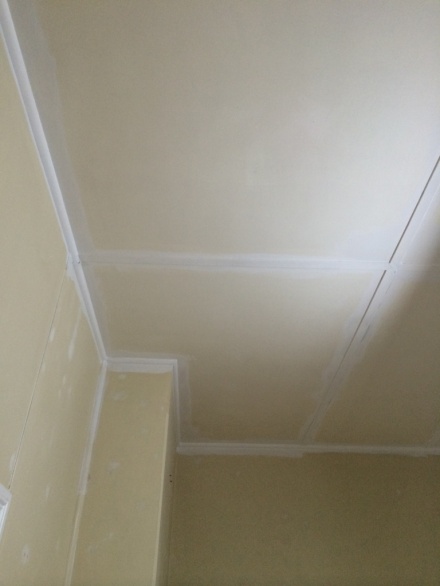
And here’s the first coat finished

Photo 4-23-14, 10 36 03 AM

Once that was done we packed up and headed out for some festivities for the day, so that was Day 1 done.

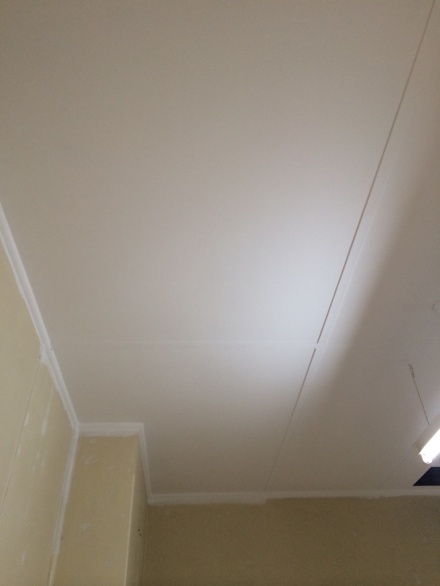
Day 2 was pretty full on for me. Ben was all caught up in bar shelving business so I cracked on with coat 2 of cutting in and then rolling the ceiling.

And the second coat looked like this

Photo 4-23-14, 3 24 17 PM

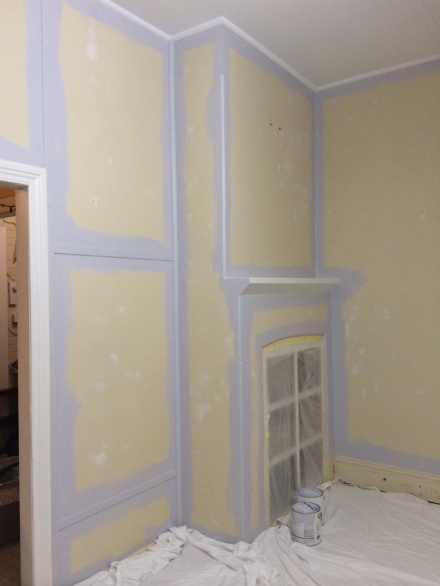
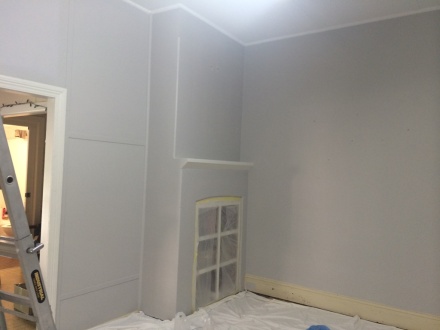
I’ve gotta say, after all of that my right arm was already in a world of pain; but Ben was on a roll with the bar business, so I kept going and got to work cutting in the walls.

Photo 4-23-14, 3 45 01 PM

In that photo I’d done probably 2 metres and already called Ben in to hear his thoughts on the colour.

“It’s fine”

“It’s not too blue?”

“It’s not even blue! Just keep going, it’ll look better when it’s all done”.  [LIES!]

But I kept going…

Photo 4-23-14, 4 39 10 PM

And going

Photo 4-23-14, 8 12 46 PM

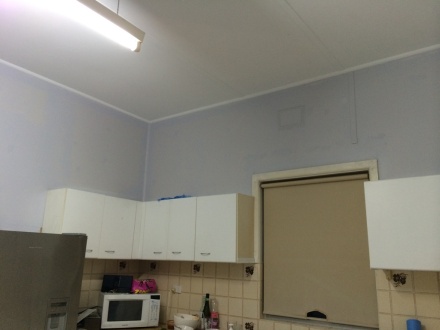
And I sent that above photo to my mum and strategically said “What do you think of the colour?”. I kid you not, her reply was

“Looks a bit blue to me, but that’s not necessarily a bad thing”.

BOOM! BLUE! I knew it!

I was no longer loving painting. Or feeling relaxed. I was stressed over the colour, and in lots of physical pain. Painting even has the word PAIN in it… it’s not meant to be fun!

Photo 4-23-14, 3 08 31 PM

Neck = Killing!!!

Once I was finished cutting in and uber disenchanted the hubs came to the rescue! He told me to put my feet up with a wine and he’d roll and surprise me when it was all finished. I was so grateful!!

I took one look at that blue room though and almost cried. “It looks like a boys nursery!”.  “I was thinking more of a hospital”. “Well neither of those things belong in my kitchen! It’s all wrong!”

We decided to sleep on it, and follow up with the second coat as it may change, and then we’d put everything back in and live with it for a while until we made a decision.Photo 4-23-14, 9 48 20 PM

Photo 4-23-14, 9 48 40 PM

When I woke up on Day 3 and came out and saw it I nearly cried again. I grabbed a grey pot mit that I like the colour of and went to Bunnings immediately for a new tin. It was a $66 mistake but I knew it was the right decision as soon as I started…

Photo 4-24-14, 10 20 32 AM

Here are the two side by side

Photo 4-24-14, 10 09 51 AM

The colour on the left is Silk Wort by Dulux in half strength, and the right is Centurion by Taubmans  and the paint itself is Taubmans Endure. For the ceiling we went with Dulux colour Lexicon in half strength as that is what the rest of the ceilings and doorways are.

Two coats of Silk Wort later… and ta-dah!

Photo 4-24-14, 2 31 39 PM

Love love love it! I think the most noticeable change is the gallery wall. Here’s the before:

photo-29-09-13-6-20-39-pm And the after: 

Photo 4-30-14, 7 48 58 PM

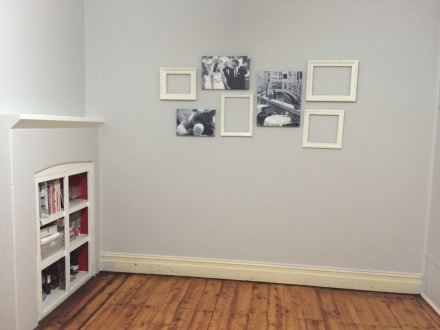
Isn’t it just so fresh and so clean clean? :) :)

Before you mention that baseboard… yes, I still do have to paint it.

Tomorrow I’ll hopefully get two coats of paint and a quarter round on that baseboard, and then Sunday, we move everything back in… Monday, you get the big reveal.

Hold onto your hats kids!

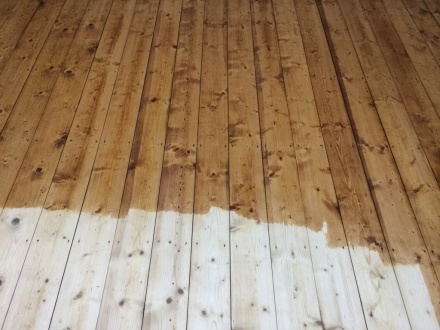
But in the meantime,  there’s a nice little sneak peak of the oiled floor for you ahead of tomorrow’s post on that.

Oh, and last but not least, I tried a little something I saw on Pinterest once… tie a rubber band around your bucket to wipe excess paint off your brush on… ladies and gents, this trick is a winner. You’re welcome.

Photo 4-23-14, 3 36 51 PM